Tuesday, November 9, 2010

Mexican Black Beans

Ok, so my favorite thing is Mexcian food... Ever since we moved to Sweden I have had a very hard time finding the right ingredients to make any good mexican food. Plus its a pretty big turn off when you go to buy the black beans and they are called svart bonors here... no joke! ha
Yesterday I decided to get creative and try out a idea I had... loe and behold they were pretty tasty! So, I'll share the idea.
Ingredients:
  • Canned Black beans rinsed (or if you are in Sweden a can of Svart bonors! I just cant get enough of saying that)
  • 1 can of chicken broth
  • 2 tablespoons fresh cilantro chopped
  • 1 small onion chopped
  • 1 clove garlic minced
  • juice of 1 lime

Directions:

  • drain and rinse the beans
  • sautee the onions and garlic for 2 minutes
  • add broth, cilantro, lime, and beans
  • Bring to a boil

Now everytime you have black beans think of what they are called in Sweden! its just plain funny! Yummy!

Love,

Dawnie

Sunday, October 31, 2010

Frozen Rasberry Cobbler (By Dawnie)


This was a huge hit a couple of weeks ago when we had a dinner party. Its so easy but Shhh dont tell. Let everyone think you are an amazing cook and worked all day to make this dessert! Its especially good with vanilla sauce all over the top.
The best part is I always use frozen berries... its so much cheaper!


Ingredients:

  • 1 Stick butter
  • 1 1/4 cups Sugar
  • 1 cup Flour
  • 1 teaspoon rising agent (Baking powder)
  • 1 cup milk
  • 2 cups rasberries or any berry (frozen or fresh)


Instructions:


  • melt the butter in the microwave.
  • In another bowl stir together 1 cup sugar, rising agent and the flour
  • Slowly add milk to sugar and flour mixture
  • finally adding the melted butter
  • Now butter the baking dish and dont be stingy the butter is the best part!
  • pour the batter in the dish
  • sprinkle the berries over the top of the batter (I sometimes push the berries down into the batter a little so I can get as many as I can!)
  • Sprinkle the remainding 1/4 cup sugar over the top
  • bake in a 350 degree oven for an hour or until perfectly golden and bubbly
  • I sprinkle a little more sugar ten minutes before its dont to make it a little crispy! YUM!

ENJOY!


Love,


Dawnie


Friday, October 29, 2010

Pumpkin Cookies

Halie's preschool teacher made these in class the other day and the kids adored them. In fact, she made them the year Sierra was in preschool too, and this was the first pumpkin thing Sierra ever ate, and she still loves them.

Adventure Preschool Pumpkin Chocolate Chip Cookies
1/2 c Butter
1 1/2 c Sugar
2 eggs
1 c Pumpkin Puree
1 tsp Vanilla
1 tsp Baking Soda
3 c Sifted Flour
1 tsp Baking Powder
1/2 tsp Salt
1 tsp Nutmeg
1 tsp Cinnamon
1 c Chocolate Chips
Mix wet ingredients in one bowl and the dry in another. Combine and mix in chocolate chips. Bake at 350 for 15 mins.  Makes 3 dozen.
Halie's job this year was to do the butter :)

Thursday, July 8, 2010

Fertilizer

I read about this a while ago, and have been excited to try it. The idea is to make a tea type fertilizer for your plants from dandelions. Apparently you can also use comfrey and horsetail, but I don't have either of those so I stuck to the dandelions. Which thanks to my no weed and feed policy we have plenty :) Dandelions are full of vitamins, and minerals and apparently all this stuff seeps into the water during the tea process and then can easily be added to your plants.
I set out with my new favorite garden tool, the dandelion picker, with high hopes of filling one 5 gallon bucket about half way. Needless to say, I filled nearly 2 and I did not even get all the dandelions I could see. I figured I'd leave some for next time.

So after the weeds are in the bucket, I weighted them down with a rock and covered with water. This first batch got to sit an extra long time because it was rainy and the soil did not need any more moisture added.

So after about a week I took out the rotting weeds and added them to the compost pile and what was left was a foul smelling grey-ish liquid. Believe me when I say it was foul smelling, for the next day every time the kids would walk in the back yard they would ask what stunk!
Admittedly I wondered if I was doming my garden to death by pouring this stinky stuff all over it, but I did not have enough for the whole garden and I figured that even if I did kill most of it I would still have a few tomato plants left. But after about a month, it looks great. I have another batch rotting, and I plan on using all my dandelions this way.
There are so many things I love about this. First I love that we are making something use full out of something that is most often though of as a nuisance. Second  I love that it is free! Third I love that it is earth friendly. Although I am not sure if it is considered organic, I like that it is not chemically prepared!
So sorry to my neighbors if I am stinking you out!

Saturday, June 12, 2010

Bulk Pancake Mix

This is another staple in my kitchen. The thrifty side of me wont allow myself to buy premade pancake mix. It is so easy and cheap to make that I cannot imagine shelling out $ for an inferior product.

1 cup all purpose flour
1 cup whole wheat flour
4 tsp baking powder
1 tsp sugar (optional)
1 tsp salt

So that is what you mix and leave in your pantry for when you need it. You can also add cinnamon, but I don't do this because this mix also works well for the topping of a pot pie, but not if it has cinnamon in it. Double, triple, whatever you want to fill the container you are storing it in.

When you are ready to make the pancakes:
3/4 cup milk (almond or soy milk also work fine)
1 egg
1 tsp vanilla
1 cup pancake mix.

Easy right!

I think you could change the wheat to white ratio, but this seems to be the ratio that works best for my kids.

Friday, June 11, 2010

Chicken trouble :(

If I am sounding like a complete lunatic complaining about a chicken then I guess I am. This chicken, whom I used to love and adore (if that is really possible with a chicken, lol) has become so naughty. She is only 1 year old and I am secretly hoping that this is some wacky teenage behaviour that will go away on it's own. Who knows!?
We fenced our garden this year to protect it from said chicken. Well, I am sad to say that all our efforts have gone to waste with her. I know she can easily fly over it, but last year when I had up chicken wire of the same height it was enough to deter her. This year I guess the temptation is just too great. I have sad little bare spots in my carrot & beet rows where she has made herself a nice little bathing spot. The purple corn that I bought specifically as a gift for my mother has seen 5 casualties due to Goldie. I had 5 seeds given to me from my neighbor's step-father's award winning ginormous pumpkins, all suffered an untimely death by Goldie. She completely incriminates herself too, leaving uprooted plants all over the garden. Pieces of the corn stalk she just killed, seedling leaves, etc. Like a child leaving a half eaten cookie on the counter. Perhaps I am giving her too much credit, but I think she knows that she is not supposed to be in there. Every time I catch her in there and head out there to shoo her out she instantly flies out of the garden. Come on, what do I have to do? Get a cardboard cut out of myself to stand guard?

The next reason she is on my bad list is that she is such a meanie to the baby chicks.  I know she is the queen bee here, but come on. She chases and pecks constantly. No damage has occurred as of yet, and I am hopeful it will stay that way. Here she is chasing the babies around an old tomato cage.

She also guards the food and water. They have their own layer's food in the coop, but when she comes out she is crazy for the baby food. I guess like I used to like baby food when I was little.  I am hoping our days start to go better and that one day soon the babies can share the coop with the bigger ones. Their box is getting mighty small :)

Goldie Guarding the food. I am amazed I got this pic, the chicks were soon chased off.


Cute little baby around 8 weeks old.

Friday, June 4, 2010

Chicken Tortilla Caserole

This is a family staple. I cannot say that I came up with it myself. It is one that my mom made when I was a child, and now I make it for my children. It changes a little every time I make it, but it has a few key ingredients.

8 Whole wheat tortillas torn into pieces
1 can Cream of Chicken Soup - preferably low fat or Healthy Request
1/2 container Sour Cream - I use fat free
1 can of diced green chilies
2 cups Chicken - cooked and diced
2 cups Shredded Cheese
1 can Black Beans (optional)


Start by tearing the tortillas into pieces. If you do not have any leftover chicken (or turkey) cook 2-3 chicken breasts, dice them and set aside. Mix together the Cream of Chicken, Sour Cream, and green chilies. In this picture I did not have green chilies so I used some green salsa. Like I said, it changes a little every time depending on what I have in my pantry.

Spray the bottom of a casserole dish with non stick spray, and spread enough of the soup mixture on the bottom to just cover it. Cover the bottom of the pan with a layer of tortillas. Just overlapping the edges by a little bit. Layer half the chicken and black beans on top of the tortillas. Place 1/3 of the soup mixture on top of the chicken and beans. It does not need to be spread out evenly, just little dollops here and there will be fine.

Sprinkle with 1/3 the shredded cheese. I do not eat cheese, but my family loves it so I only cover half the pan with cheese. Repeat the layer process one more time, and on the last layer time, only cover with tortillas, soup mixture and cheese.
Finally cover with foil and cook at 425 for 25 mins (or until heated through and cheese is melted and bubbling around the edges)

This recipe also freezes very well. When I freeze it I do not add the final layer of cheese. I let it defrost in my fridge if I have the time. If I have not thought ahead (which is most of the time) I just put it in the oven at a lower temp for a longer period of time. 300 - 325 for 1 1/2 hours. I usually uncover it in the last 30 mins and sprinkle with cheese.

Thursday, May 27, 2010

Flower Birthday Cake

esNormally I try to make things more healthy than they already are, but I have a huge weakness for cake. This is the one food that I will not mess with. So here is the full fat, sugar and chocolate (yes chocolate!) version of the flower birthday cake I created for my daughter's 4th birthday. I got lots of inspiration as always from
Bakerella, and then changed a few details to fit my needs.


First we started with 3 boxes of the funfetti cake mix. This is for 4 year old after all :) We prepared the mix as the package said then put half of it in a 9X13 pan, and the other half in a Wilton Heart Tasty-Fill Cake Pan. http://www.wilton.com/store/site/product.cfm?id=9349557A-423B-522D-F223D89DFC184E85&killnav=1 I was a little worried that the pan would overflow, but it did not, and the result was exactly what I had hoped for. I wanted the cake to stand taller than just two 9" rounds stacked together, and it did.
This is the bottom of the cake before I filled it with the pudding.


Once baked and cooled I filled the cake with chocolate pudding and frosted it with one of my favorite cream cheese frosting recipes. The recipe was originally for a carrot cake, but goes well with just about everything and is easy to use in a decorating bag.


Cream Cheese Frosting
1 block cream cheese at room temperature
1 stick of butter also at room temperature
1 tsp vanilla
1 box confectioner sugar (3 3/4 c)

Now the fun part: The Cake Balls! Here is a link to the original that inspired my take on these balls:
http://www.bakerella.com/mom-pops/
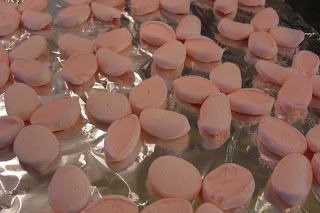
Because it is not the season for Easter candy corns I used pink marshmallows that I cut in quarters to make the petals, and M&Ms for the center of the flower. All glued together with white chocolate melt aways.  I found it easier to set the dipped pops onto the petals that I laid out on some foil, rather than place petals onto the cake ball upright. I also found that the colder the balls were the easier it was to do, but this created a little cracking problem at the end. When the balls warmed up some of them cracked, but not bad enough that I would do anything different.

Also on a side note, thanks to ShopKo for the Styrofoam. I am chronically cheap and did not like the idea of buying some Styrofoam so I asked a nice worker at ShopKo if they had some they were throwing away and he gave me as much as I needed!
When I was all done I placed some of the flower cake balls on top of the cake and displayed the rest in the Styrofoam. It was also tons easier to serve each little kid a cake ball rather than a slice if cake. Perfect size for little kids :) Plus it left the yummy cake for the moms.

Look how pretty it turned out!

Snow!

Hopefully the last snow of the year! It is almost June after all. Good thing I elected to cover the garden. I am still not sure if the cold weather will have stunted the growth of the tomatoes. I guess only time will tell.
This pic was taken on Monday, and today I looked out there and sure enough I have seeds starting to poke out of the ground. The rest of the garden seems unaffected.

Tuesday, May 25, 2010

Congo Bars

Oooh, I found something fantastic today. Well, actually I found it the other night, but tried it today. The idea is not at all mine, but I found it on one of my favorite sites, Bakerella.com. This little piece of heaven is called the Congo Bar, and wow! Bakerella refers to it as a cross between a brownie and a chocolate chip cookie, and I refer to it as a cross between the best thing I have ever tasted, and well the best thing I have ever tasted. For what it lacks in nutritional value it more than makes up for in taste!
http://www.bakerella.com/i-hope-you-have-chocolate-chips-handy/
I should mention that while making this I found out that 1 lb of brown sugar is equal to 2 1/3 c - 2 1/2 c brown sugar. Which you will need if you decide to make this yummy recipe.  So I actually learned something while cooking today, bonus!

Saturday, May 22, 2010

Cold Spring

 Well, last week I planted my garden. It was 80 degrees and a week later in the year than I normally plant. I thought my plants would be safe. Then March returned with nightly lows in the 40's and this is just too cold for my precious little tomato and pepper plants. It has not been cold enough to freeze, but I am concerned that it has been cold enough to stunt their growth through the season.
This is the my solution to the cold weather, haha. I only have 3 walls of water. So I rounded up every trash can, Homer Bucket, and old ice cream bucket I could find, and I have been covering them all every night. All twenty-four of them! Very aesthetically pleasing right? Well I hope it does the job.


This is the first year that I have started my tomatoes from seed. So needless to say I am a little overprotective of these little plants. I mean after all the time I spent moving them into the sun and protecting them from dogs and kids; I really want these plants to live. Not to mention the cheap side of me dreads the thought of the wasted  money if I let them die at this point, and the running around to find the varieties that I want to plant. Yikes!
Funny to think of the things that scare me these days!

Friday, May 21, 2010

Why wait?

I spent the evening reading through other blogs, and I came to the conclusion that I really want to write. Also that there is really no reason not to. Somewhere I read that you should not wait for conditions to be perfect to write, you should just do it. That is how I am feeling today. I am just going to write. As with most things getting started is the hard part, right? So here goes!