Showing posts with label baking. Show all posts

Wednesday, October 19, 2011

Easy Fruit Cobbler


Tis the season for excess fruit. Hooray I've been waiting for this season all year, lol. Currently I've got buckets of pears and apples to go through.

I found this by searching for "easy apple cobbler" and it's fabulous! Top it with some vanilla sauce and you've just gone to heaven. The kiddos love it too!

The first night I did what the recipe said and used apples, but last night I used pears and since I ran out of white sugar I used brown sugar. Sierra said it was even better than the apple one. So, I am thinking that it would work with whatever fruit I had on hand.

EASY APPLE COBBLER


Apple Mixture:
5 c. Apples, sliced

1/2 c. Sugar

2 tbs Flour

1/2 tsp Cinnamon

1/4 tsp Salt

1/4 c Water

1 tsp Vanilla

1 tbs Butter, softened

Combine above ingredients; mix gently. Spoon into a lightly greased 9-inch square baking pan.

Batter:

1/2 c Flour

1/2 c Sugar

1/2 tsp Baking powder

1/4 tsp Salt

2 tbs Butter, softened

1 Egg

Combine batter ingredients; mix well. Spoon over apple mixture in 9 equal portions (batter will spread during baking). Bake in a preheated 375°F oven for 35 to 40 minutes.

Yield: 6 servings.

Here is the original recipe that I took this from.

Wednesday, April 13, 2011

Vanilla Sauce

This one is for you Mandy... Its the closest thing to the boxed kind you can get here... I made it last night and Then put it over strawberries.  Dont judge... Rikard is out of town and I am lonely! (and bored!) I have to keep reminding myself I have to fit into a wedding dress in a few months. CRAP!


Ingredients (serves 4)

1 cup milk
1 cup thickened cream
1 vanilla bean (see note)
4 egg yolks
1 tablespoon cornflour
1/3 cup caster sugar

Directions:
1. Combine milk and cream in a small saucepan. Using a sharp knife, split vanilla bean in half lengthways and scrape out seeds. Add bean and seeds to milk mixture. Place over medium heat. Cook, stirring constantly, for 5 minutes or until hot (do not allow to boil). Remove saucepan from heat.


2. Whisk egg yolks, cornflour and sugar in a heatproof bowl until well combined. Remove vanilla beans from milk mixture. Pour hot milk mixture over egg yolk mixture, whisking constantly.

3.Return mixture to saucepan over low heat. Cook, stirring constantly, for 15 to 20 minutes or until custard thickens and coats the back of a metal spoon (do not allow custard to boil, as it might curdle).

4. Serve custard warm or cold over stewed fruit, pancakes or crumbles.


Notes:
You could use 1 teaspoon vanilla extract or vanilla powder instead of the vanilla bean.

If cooling custard for later use, cover the surface with plastic wrap to prevent a skin forming.

Monday, April 4, 2011

White Chocolate Raspberry Cheesecake

Here is another winner.... Rikard said it goes in the top 3 so that has to mean its pretty good!  I can never tell if the things I make really taste good, or I just think they do because I work so darn hard making them. So Rikard is my test dummy, I swear he would try poop if it looked good enough... Just saying!

The only thing I might change with this is I would rather a graham cracker crust, I am not a big fan of chocolate... Maybe due to the fact that the night before I made this I ate an entire pack of Oreos... YUCK! I have had my feel of chocolate cookies!!!

Ingredients


• 1 cup chocolate cookie crumbs

• 3 tablespoons white sugar

• 1/4 cup butter, melted

• 1 (10 ounce) package frozen raspberries

• 2 tablespoons white sugar

• 2 teaspoons cornstarch

• 1/2 cup water

• 2 cups white chocolate chips

• 1/2 cup half-and-half cream

• 3 (8 ounce) packages cream cheese, softened

• 1/2 cup white sugar

• 3 eggs

• 1 teaspoon vanilla extract

Directions

1. In a medium bowl, mix together cookie crumbs, 3 tablespoons sugar, and melted butter. Press mixture into the bottom of a 9 inch springform pan.

2. DOUBLE THIS PART ITS WORTH IT TRUST ME! SO GOOD! In a saucepan, combine raspberries, 2 tablespoons sugar, cornstarch, and water. Bring to boil, and continue boiling 5 minutes, or until sauce is thick. Strain sauce through a mesh strainer to remove seeds. (I didn't strain mine...)

3. Preheat oven to 325 degrees F (165 degrees C). In a metal bowl over a pan of simmering water, melt white chocolate chips with half-and-half, stirring occasionally until smooth. (Honestly I just threw them in to the microwave... Worked just fine!)

4. In a large bowl, mix together cream cheese and 1/2 cup sugar until smooth. Beat in eggs one at a time. Blend in vanilla and melted white chocolate. Pour half of batter over crust. Spoon 3 tablespoons raspberry sauce over batter. Pour remaining cheesecake batter into pan, and again spoon 3 tablespoons raspberry sauce over the top. Swirl batter with the tip of a knife to create a marbled effect.

5. Bake for 55 to 60 minutes, or until filling is set. Cool, cover with plastic wrap, and refrigerate for 8 hours before removing from pan. Serve with remaining raspberry sauce.

AND how can you resist fresh whipped cream with vanilla bean in it! Oh God the little fat kid inside of me is screaming to get out...

Wednesday, March 30, 2011

Yummy Brownies

Rikard and I had a sweet tooth the other night so I found this pretty yummy recipe for brownies... The honey makes the frosting to die for! I think I ate half of it before the brownies were even out of the oven.  I am sure you could do the brownies with spray butter os something healthier, but you know me I am all about the butter! Mmmm!


Ingredients

1/2 cup butter

1 cup white sugar

2 eggs

1 teaspoon vanilla extract

1/3 cup unsweetened cocoa powder

1/2 cup all-purpose flour

1/4 teaspoon salt

1/4 teaspoon baking powder


3 tablespoons butter, softened

3 tablespoons unsweetened cocoa powder

1 tablespoon honey

1 teaspoon vanilla extract

1 cup confectioners' sugar


Directions

1. Preheat oven to 350 degrees F (175 degrees C). Grease and flour an 8 inch square pan.

2. In a large saucepan, melt 1/2 cup butter. Remove from heat, and stir in sugar, eggs, and 1 teaspoon vanilla. Beat in 1/3 cup cocoa, 1/2 cup flour, salt, and baking powder. Spread batter into prepared pan.

3. Bake in preheated oven for 25 to 30 minutes. Do not overcook.

4. To Make Frosting: Combine 3 tablespoons butter, 3 tablespoons cocoa, 1 tablespoon honey (I did 2 tablespoons and it made it even better) , 1 teaspoon vanilla, and 1 cup confectioners' sugar. Frost brownies while they are still warm.


Wednesday, March 23, 2011

Applesauce Bread

Ok, this I my own little baby (insert proud smile here)!
I was sleepy and wanted some sweet bread, but I had run out of shredded frozen zucchini and my bananas were not ripe enough for bread yet. Soooo, this is what I came up with.

3/4 c Fat Free Sour Cream
3/4 c Brown Sugar
1 tsp Vanilla
3 Egg Whites
1 c Applesauce
2 c Whole Wheat Flour
1 tsp Baking Soda
1 tsp Baking Powder
1/2 tsp Salt
1/2 tsp Cinnamon
1/2 tsp Allspice
1 c Craisins or Raisins

Mix brown sugar, sour cream and vanilla. Add egg whites and applesauce and mix well. Add remaining ingredients, except Craisins, and mix until combined. Stir in Craisins and fill loaf pan. Cook at 350 for 60 mins. I usesd mini loaf pans and only cooked them for 30 mins. So yummy and pretty healthy!

Thursday, March 10, 2011

Banana muffins

Last week I decided to master Banana Muffins... Here in Sweden they don't really know what a good muffin is. So I was on a mission to show them what a REAL muffin is. When I say muffin I am talking about a Big muffin with an even Bigger top, broke in two with butter melting on both pieces! SO good! I had 2 recipes I wanted to try and I still cant decided which I liked more, Rikard preferred the first recipe. 


Ingredients
  • 1 1/2 cups all-purpose flour
  • 1 teaspoon baking soda
  • 1 teaspoon baking powder
  • 1/2 teaspoon salt
  • 3 bananas, mashed
  • 3/4 cup white sugar
  • 1 egg, lightly beaten
  • 1/3 cup butter, melted
  • 1/3 cup packed brown sugar
  • 2 tablespoons all-purpose flour
  • 1/8 teaspoon ground cinnamon
  • 1 tablespoon butter
Directions
1.     Preheat oven to 375 degrees F (190 degrees C). Lightly grease 10 muffin cups, or line with muffin papers.
2.     In a large bowl, mix together 1 1/2 cups flour, baking soda, baking powder and salt. In another bowl, beat together bananas, sugar, egg and melted butter. Stir the banana mixture into the flour mixture just until moistened. Spoon batter into prepared muffin cups.
3.     In a small bowl, mix together brown sugar, 2 tablespoons flour and cinnamon. Cut in 1 tablespoon butter until mixture resembles coarse cornmeal. Sprinkle topping over muffins.
Bake in preheated oven for 18 to 20 minutes, until a toothpick inserted into center of a muffin comes out clean


This next one makes like 3 pans of muffins... They have a more cake like consistency.


Ingredients
  • 2 sticks Butter
  • 1-½ cup + 2 TBLS Sugar
  • 3 whole Eggs
  • 1-½ cup Mashed Ripe Bananas
  • 4 cups + 2 TBLS Flour
  • 1 teaspoon Baking Soda
  • 1-½ teaspoon Baking Powder
  • 1-½ cup Sour Cream
Preparation Instructions
Preheat oven to 350 degrees.
Grease muffin pan.
Cream butter and sugar together. Add eggs one at a time, beating for a few seconds after each addition. Add mashed bananas and beat.
Combine dry ingredients in a separate bowl.
Add dry ingredients and sour cream alternately to the mixing bowl. Beat well until all combined.
Pour into muffin pan and bake for 45 minutes to an hour or until a toothpick comes out clean.
Invert on a cooling rack and allow cake to cool slightly before slicing and serving with softened butter.
I also put the brown sugar crumbs on top of these and it made them delicious!


So, let me know which one you think is better! Good luck

Friday, June 4, 2010

Chicken Tortilla Caserole

This is a family staple. I cannot say that I came up with it myself. It is one that my mom made when I was a child, and now I make it for my children. It changes a little every time I make it, but it has a few key ingredients.

8 Whole wheat tortillas torn into pieces
1 can Cream of Chicken Soup - preferably low fat or Healthy Request
1/2 container Sour Cream - I use fat free
1 can of diced green chilies
2 cups Chicken - cooked and diced
2 cups Shredded Cheese
1 can Black Beans (optional)


Start by tearing the tortillas into pieces. If you do not have any leftover chicken (or turkey) cook 2-3 chicken breasts, dice them and set aside. Mix together the Cream of Chicken, Sour Cream, and green chilies. In this picture I did not have green chilies so I used some green salsa. Like I said, it changes a little every time depending on what I have in my pantry.

Spray the bottom of a casserole dish with non stick spray, and spread enough of the soup mixture on the bottom to just cover it. Cover the bottom of the pan with a layer of tortillas. Just overlapping the edges by a little bit. Layer half the chicken and black beans on top of the tortillas. Place 1/3 of the soup mixture on top of the chicken and beans. It does not need to be spread out evenly, just little dollops here and there will be fine.

Sprinkle with 1/3 the shredded cheese. I do not eat cheese, but my family loves it so I only cover half the pan with cheese. Repeat the layer process one more time, and on the last layer time, only cover with tortillas, soup mixture and cheese.
Finally cover with foil and cook at 425 for 25 mins (or until heated through and cheese is melted and bubbling around the edges)

This recipe also freezes very well. When I freeze it I do not add the final layer of cheese. I let it defrost in my fridge if I have the time. If I have not thought ahead (which is most of the time) I just put it in the oven at a lower temp for a longer period of time. 300 - 325 for 1 1/2 hours. I usually uncover it in the last 30 mins and sprinkle with cheese.

Thursday, May 27, 2010

Flower Birthday Cake

esNormally I try to make things more healthy than they already are, but I have a huge weakness for cake. This is the one food that I will not mess with. So here is the full fat, sugar and chocolate (yes chocolate!) version of the flower birthday cake I created for my daughter's 4th birthday. I got lots of inspiration as always from
Bakerella, and then changed a few details to fit my needs.


First we started with 3 boxes of the funfetti cake mix. This is for 4 year old after all :) We prepared the mix as the package said then put half of it in a 9X13 pan, and the other half in a Wilton Heart Tasty-Fill Cake Pan. http://www.wilton.com/store/site/product.cfm?id=9349557A-423B-522D-F223D89DFC184E85&killnav=1 I was a little worried that the pan would overflow, but it did not, and the result was exactly what I had hoped for. I wanted the cake to stand taller than just two 9" rounds stacked together, and it did.
This is the bottom of the cake before I filled it with the pudding.


Once baked and cooled I filled the cake with chocolate pudding and frosted it with one of my favorite cream cheese frosting recipes. The recipe was originally for a carrot cake, but goes well with just about everything and is easy to use in a decorating bag.


Cream Cheese Frosting
1 block cream cheese at room temperature
1 stick of butter also at room temperature
1 tsp vanilla
1 box confectioner sugar (3 3/4 c)

Now the fun part: The Cake Balls! Here is a link to the original that inspired my take on these balls:
http://www.bakerella.com/mom-pops/
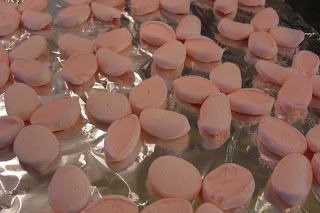
Because it is not the season for Easter candy corns I used pink marshmallows that I cut in quarters to make the petals, and M&Ms for the center of the flower. All glued together with white chocolate melt aways.  I found it easier to set the dipped pops onto the petals that I laid out on some foil, rather than place petals onto the cake ball upright. I also found that the colder the balls were the easier it was to do, but this created a little cracking problem at the end. When the balls warmed up some of them cracked, but not bad enough that I would do anything different.

Also on a side note, thanks to ShopKo for the Styrofoam. I am chronically cheap and did not like the idea of buying some Styrofoam so I asked a nice worker at ShopKo if they had some they were throwing away and he gave me as much as I needed!
When I was all done I placed some of the flower cake balls on top of the cake and displayed the rest in the Styrofoam. It was also tons easier to serve each little kid a cake ball rather than a slice if cake. Perfect size for little kids :) Plus it left the yummy cake for the moms.

Look how pretty it turned out!

Tuesday, May 25, 2010

Congo Bars

Oooh, I found something fantastic today. Well, actually I found it the other night, but tried it today. The idea is not at all mine, but I found it on one of my favorite sites, Bakerella.com. This little piece of heaven is called the Congo Bar, and wow! Bakerella refers to it as a cross between a brownie and a chocolate chip cookie, and I refer to it as a cross between the best thing I have ever tasted, and well the best thing I have ever tasted. For what it lacks in nutritional value it more than makes up for in taste!
http://www.bakerella.com/i-hope-you-have-chocolate-chips-handy/
I should mention that while making this I found out that 1 lb of brown sugar is equal to 2 1/3 c - 2 1/2 c brown sugar. Which you will need if you decide to make this yummy recipe.  So I actually learned something while cooking today, bonus!